Check out this link to learn more - http://www.meetup.com/Milwaukee-Tech-Engine/events/152558622/
Great Lakes

Sunday, December 1, 2013
New Event in Milwaukee - December 11th
With all the different wireless technologies available, how do you decide
which one is right for you? The Milwaukee Tech Engine would like to invite you
to learn about the different wireless technologies around you. In this
technical talk, we will survey the different wireless technologies available and
showcase demos of how they might be used. The demos will be focused on using
wireless technologies in the embedded space for integration into custom designed
products.
Chip of the Week: Maximize your energy measurement
I wanted to let you know of a new energy measurement
solution from Maxim Integrated. By utilizing a low-cost galvanic
isolation method that doubles as a communication medium, Maxim has created an
accurate energy measurement system. There is a development kit available
for this device and we can help you get started. Check out this link to
learn more - http://www.maximintegrated.com/app-notes/index.mvp/id/5723

Features
|
|
· High-accuracy
power measurement
· High-voltage
galvanic isolation
· Preset
gain/offset parameters
· On-board
voltage sensing resistor divider with a ratio of 2667:1 with good temperature
coefficient
· Pluggable
terminals for AC (8A max)
· Small
printed-circuit board (PCB) area
· Device
drivers
· Configuration
files for Xilinx LX9 and ZedBoard™ platforms
· Pmod™-compatible
form factor
|
Thursday, November 7, 2013
New Event In Milwaukee - November 20th
Please join an after hours engineering talk presented by Milwaukee Tech Engine. To learn more and sign up visit this link. http://www.meetup.com/Milwaukee-Tech-Engine/
 |
| To learn more check outhttp://www.meetup.com/Milwaukee-Tech-Engine/ |
Friday, October 25, 2013
Spooky Halloween and the Internet of Things...
In honor of Halloween coming I wanted to share this video on adding wireless devices to your Halloween. If you need help in getting these devices to work, please feel free to contact your local Avnet team:
In Milwaukee Next Wednesday - Attend Avnet's Embedded World
Please attend our Avnet Embedded World event next Wednesday - www.em.avnet.com/avnetgreatlakes_embeddedworld


Tuesday, August 13, 2013
Bluetooth Low Energy Training
Are you getting started in Bluetooth Low Energy, have you already done a few designs? TI has some training videos depending on your experience. Check it out at this link - link.
| What's your Bluetooth low energy expertise level? (Which training is right for you?) |
 | ||
Thursday, August 1, 2013
Check out the new Zynq board - MicroZed
Team,
For $199 you can get the new Zynq FPGA with a lot of great peripherals in this great development board called - MicroZed. Zynq is the new SoC from Xilinx with two ARM A9 application processors combined with programmable logic. This board comes with a license to the design tools and can even be customized to be used directly into products. To learn more check out this link - link.


Tuesday, July 2, 2013
Need a DIY Solder Stencil - Use a Soda Can!
Even though solder stencils are available from low cost sources, I did find a useful article outlining how to go through and make your own solder stencil. It uses a soda can and uses Eagle as the EDA layout tool to explain the in depth tutorial. Check out the link - link.


New Atmel Software Framework Released
I spent some time this week playing with the new SAM4S, SAM4L, and SAM D20 new ARM microcontrollers from Atmel. The new software tool in Atmel Studio made it easy to create simple projects. The framework is the Atmel Software Framework and it allows you to add perhiperal features in a straight-forward manner. Check out more at the link - link.
![asf_structure_thumb[11]](http://www.electronics-lab.com/blog/wp-content/uploads/2013/06/asf_structure_thumb11.jpg)
Friday, June 14, 2013
Maxim Turns 30!
I missed the day as I was on vacation but I found a good link with a video talking about the history of Maxim Integrated - [link]
Understanding Slew Rate of Op-Amps

Bruce Trump writes:
Slewing behavior of op amps is often misunderstood. It’s a meaty topic so let’s sort it out.Slew Rate – the op amp speed limit - [Link]
The input circuitry of an op amp circuit generally has a very small voltage between the inputs—ideally zero, right? But a sudden change in the input signal temporarily drives the feedback loop out of balance creating a differential error voltage between the op amp inputs. This causes the output to race off to correct the error. The larger the error, the faster it goes… that is until the differential input voltage is large enough to drive the op amp into slewing.
Thursday, May 23, 2013
Whistled - An old idea now reinvented
For those of you looking for a fun project to look at, check out the Whistled - a whistle controlled processing platform. This is a great project complete with schematics. I appreciate the level of detail that the engineer goes into on controlling basic items around the house through whistling. Check out the video on this link - link.
Wednesday, May 15, 2013
Top 25 Global Electronics Distributors
Hello, I wanted to share EDN's posting on the top 25 electronics distributors. While most engineers focus on the details of the design at-hand, it is always good to take a step back and think about how you are going to source your components. I thought this link was a good look at the distributors - link.
New Paper on BeagleBone Black
In case you have not seen this, TI showcased a whitepaper on the features and benefits of their low-cost BeagleBone Black development kit. Check out the link - link.
Sunday, April 21, 2013
AT&T Archives - Check it out
I found out about the AT&T Tech Channel on YouTube. There are numerous videos relating to AT&T and some of the discoveries done at Bell Labs. Check out this example video on Vacuum Tubes.
Have a great weekend!
Have a great weekend!
Saturday, April 20, 2013
Chip of the Week: MAX21000
Hello Great Lakes Friends. I wanted to share with you more details about the MAX21000 - Maxim Integrated's three axis gyroscope. Its key benefits are that it operates off of 1.8V, has an internal supply for improved performance in a noisy system, and has the highest accuracy across temperature and aging. So where could you use a gyroscope? I included a few ideas of where they are used today:

- Motion control, gaming
- Navigation applications
- OIS/EIS
- Robotics
- Health/sports monitoring
- Remote controllers
- Toys
- Wearable Sensors
Wednesday, April 17, 2013
New Touch Technology
Hello Friends of the Great Lakes. I hope you are well and wanted to show you a great youtube video I found of Fujitsu creating a new user interface for real-world objects. Check out the link and let me know where you think you could use something like this:
Thursday, April 11, 2013
Struggling to Select the Perfect Microcontroller
EDN had a great article this week on a subject I deal with a lot: how to select a microcontroller. One of the particular points I enjoyed reading was on engaging with your local field engineer. I really think a person to person dialogue about the design decisions can really help in accelerating a selection. We are here to help!
Here is the full link - link.
Selecting the right microcontroller for a product can be a daunting task. Not only are there a number of technical features to consider, there are also business case issues such as cost and lead-times that can cripple a project. At the start of a project there is a great temptation to jump in and start selecting a microcontroller before the details of the system has been hashed out. This is of course a bad idea. Before any thought is given to the microcontroller, the hardware and software engineers should work out the high levels of the system, block diagram and flowchart them and only then is there enough information to start making a rational decision on microcontroller selection. When that point is reached, there are 10 easy steps that can be followed to ensure that the right choice is made.
Step 1: Make a list of required hardware interfaces
Using the general hardware block diagram, make a list of all the external interfaces that the microcontroller will need to support. There are two general types of interfaces that need to be listed. The first are communication interfaces. These are peripherals such as USB, I2C, SPI, UART, and so on. Make a special note if the application requires USB or some form of Ethernet. These interfaces greatly affect how much program space the microcontroller will need to support. The second type of interface is digital inputs and outputs, analog to digital inputs, PWM’s, etc. These two interface types will dictate the number of pins that will be required by the microcontroller. Figure 1 shows a generic example of a block diagram with the i/o requirements listed.

Figure 1. List of Hardware Features
Step 2: Examine the software architecture
The software architecture and requirements can greatly affect the selection of a microcontroller. How heavy or how light the processing requirements will determine whether you go with an 80 MHz DSP or an 8 MHz 8051. Just like with the hardware, make notes of any requirements that will be important. For example, do any of the algorithms require floating point mathematics? Are there any high frequency control loops or sensors? Estimate how long and how often each task will need to run. Get an order of magnitude feel for how much processing power will be needed. The amount of computing power required will be one of the biggest requirements for the architecture and frequency of the microcontroller.
Step 3: Select the architecture
Using the information from steps 1 and 2 an engineer should be able to start getting an idea of the architecture that will be needed. Can the application get by with eight bit architectures? How about 16 bits? Does it require a 32 bit ARM core? Between the application and the required software algorithms these questions will start to converge on a solution. Don’t forget to keep in mind possible future requirements and feature creep. Just because you could currently get by with an 8 bit microcontroller doesn’t mean you shouldn’t consider a 16 bit microcontroller for future features or even for ease of use. Don’t forget that microcontroller selection can be an iterative process. You may select a 16-bit part in this step but then in a later step find that a 32 bit ARM part works better. This step is simply to start getting an engineer to look in the right direction.
[Click below for more steps]
Title-1
Step 4: Identify Memory Needs
Flash and RAM are two very critical components of any microcontrollers. Making sure that you don’t run out of program space or variable space is undoubtedly of highest priority. It is far easier to select a part with too much of these features than not enough. Getting to the end of a design and discovering that you need 110% or that features need to be cut just isn’t going to fly. After all, you can always start with more and then later move to a more constrained part within the same chip family. Using the software architecture and the communication peripherals included in the application, an engineer can estimate how much flash and RAM will be required for the application. Don’t forget to leave room for feature creep and the next versions! It will save many headaches in the future.
Step 5: Start searching for microcontrollers
Now that there is a better idea of what the required features of the microcontroller will be the search can begin! One place that can be a good place to start is with a microcontroller supplier such as Arrow, Avnet, Future Electronics or similar. Talk with an FAE about your application and requirements and often times they can direct you to a new part that is cutting edge and meets the requirements. Just keep in mind that they might have pressure on them at that time to push a certain family of microcontrollers!
The next best place to start is with a silicon provider that you are already familiar with. For example, if you have used Microchip parts in the past and had a good experience with them, then start at their website. Most silicon providers have a search engine that allows you to enter your peripheral sets, I/O and power requirements and it will narrow down the list of parts that match the criteria. From that list the engineer can then move forward towards selecting a microcontroller.
Step 6: Examine Costs and Power Constraints
At this point the selection process has revealed a number of potential candidates. This is a great time to examine the power requirements and cost of the part. If the device will be powered from a battery and mobile, then making sure the parts are low-power is absolutely precarious. If it doesn’t meet power requirements then keep weeding the list down until you have a select few. Don’t forget to examine the piece price of the processor either. While prices have steadily been approaching $1 in volume for many parts, if it is highly specialized or a high-end processing machine then price might be critical. Don’t forget about this key element.
[Click below for more steps]
Title-1
Step 7: Check part availability
With the list of potential parts in hand, now is a good time to start checking on how available the part is. Some of the things to keep in mind are what the lead times for the part? Are they kept in stock at multiple distributors or is there 6 – 12 week lead time? What are your requirements for availability? You don’t want to get stuck with a large order and have to wait three months to be able to fill it. Then there is a question of how new the part is and whether it will be around for the duration of your product life cycle. If your product will be around for 10 years then you need to find a part that the manufacturer guarantees will still be built in 10 years.
Step 8: Select a development kit
One of the best parts of selecting a new microcontroller is finding a development kit to play with and learn the inner working of the controller. Once an engineer has settled their heart on the part they want to use they should research what development kits are available. If a development kit isn’t available then the selected part is most likely not a good choice and they should go back a few steps and find a better part. Most development kits today cost under $100. Paying any more than that (unless it is designed to work with multiple processor modules) is just too much. Another part may be a better choice.
Step 9: Investigate compilers and tools
The selection of the development kit nearly solidifies the choice of microcontroller. The last consideration is to examine the compiler and tools that are available. Most microcontrollers have a number of choices for compilers, example code and debugging tools. It is important to make sure that all the necessary tools are available for the part. Without the right tools the development process could become tedious and expensive.
Step 10: Start Experimenting
Even with the selection a microcontroller nothing is set in stone. Usually the development kit arrives long before the first prototyped hardware. Take advantage by building up test circuits and interfacing them to the microcontroller. Choose high risk parts and get them working on the development kit. It may be that you discover the part you thought would work great has some unforeseen issue that would force a different microcontroller to be selected. In any event, early experimentation will ensure that you made the right choice and that if a change is necessary, the impact will be minimal!
Jacob Beningo is a lecturer and consultant on embedded system design. He works with companies to develop quality and robust products and overcome their embedded design challenges. Feel free to contact him at jacob@beningo.com or at his website www.beningo.com.
Here is the full link - link.
Selecting the right microcontroller for a product can be a daunting task. Not only are there a number of technical features to consider, there are also business case issues such as cost and lead-times that can cripple a project. At the start of a project there is a great temptation to jump in and start selecting a microcontroller before the details of the system has been hashed out. This is of course a bad idea. Before any thought is given to the microcontroller, the hardware and software engineers should work out the high levels of the system, block diagram and flowchart them and only then is there enough information to start making a rational decision on microcontroller selection. When that point is reached, there are 10 easy steps that can be followed to ensure that the right choice is made.
Step 1: Make a list of required hardware interfaces
Using the general hardware block diagram, make a list of all the external interfaces that the microcontroller will need to support. There are two general types of interfaces that need to be listed. The first are communication interfaces. These are peripherals such as USB, I2C, SPI, UART, and so on. Make a special note if the application requires USB or some form of Ethernet. These interfaces greatly affect how much program space the microcontroller will need to support. The second type of interface is digital inputs and outputs, analog to digital inputs, PWM’s, etc. These two interface types will dictate the number of pins that will be required by the microcontroller. Figure 1 shows a generic example of a block diagram with the i/o requirements listed.
Figure 1. List of Hardware Features
Step 2: Examine the software architecture
The software architecture and requirements can greatly affect the selection of a microcontroller. How heavy or how light the processing requirements will determine whether you go with an 80 MHz DSP or an 8 MHz 8051. Just like with the hardware, make notes of any requirements that will be important. For example, do any of the algorithms require floating point mathematics? Are there any high frequency control loops or sensors? Estimate how long and how often each task will need to run. Get an order of magnitude feel for how much processing power will be needed. The amount of computing power required will be one of the biggest requirements for the architecture and frequency of the microcontroller.
Step 3: Select the architecture
Using the information from steps 1 and 2 an engineer should be able to start getting an idea of the architecture that will be needed. Can the application get by with eight bit architectures? How about 16 bits? Does it require a 32 bit ARM core? Between the application and the required software algorithms these questions will start to converge on a solution. Don’t forget to keep in mind possible future requirements and feature creep. Just because you could currently get by with an 8 bit microcontroller doesn’t mean you shouldn’t consider a 16 bit microcontroller for future features or even for ease of use. Don’t forget that microcontroller selection can be an iterative process. You may select a 16-bit part in this step but then in a later step find that a 32 bit ARM part works better. This step is simply to start getting an engineer to look in the right direction.
[Click below for more steps]
Title-1
Step 4: Identify Memory Needs
Flash and RAM are two very critical components of any microcontrollers. Making sure that you don’t run out of program space or variable space is undoubtedly of highest priority. It is far easier to select a part with too much of these features than not enough. Getting to the end of a design and discovering that you need 110% or that features need to be cut just isn’t going to fly. After all, you can always start with more and then later move to a more constrained part within the same chip family. Using the software architecture and the communication peripherals included in the application, an engineer can estimate how much flash and RAM will be required for the application. Don’t forget to leave room for feature creep and the next versions! It will save many headaches in the future.
Step 5: Start searching for microcontrollers
Now that there is a better idea of what the required features of the microcontroller will be the search can begin! One place that can be a good place to start is with a microcontroller supplier such as Arrow, Avnet, Future Electronics or similar. Talk with an FAE about your application and requirements and often times they can direct you to a new part that is cutting edge and meets the requirements. Just keep in mind that they might have pressure on them at that time to push a certain family of microcontrollers!
The next best place to start is with a silicon provider that you are already familiar with. For example, if you have used Microchip parts in the past and had a good experience with them, then start at their website. Most silicon providers have a search engine that allows you to enter your peripheral sets, I/O and power requirements and it will narrow down the list of parts that match the criteria. From that list the engineer can then move forward towards selecting a microcontroller.
Step 6: Examine Costs and Power Constraints
At this point the selection process has revealed a number of potential candidates. This is a great time to examine the power requirements and cost of the part. If the device will be powered from a battery and mobile, then making sure the parts are low-power is absolutely precarious. If it doesn’t meet power requirements then keep weeding the list down until you have a select few. Don’t forget to examine the piece price of the processor either. While prices have steadily been approaching $1 in volume for many parts, if it is highly specialized or a high-end processing machine then price might be critical. Don’t forget about this key element.
[Click below for more steps]
Title-1
Step 7: Check part availability
With the list of potential parts in hand, now is a good time to start checking on how available the part is. Some of the things to keep in mind are what the lead times for the part? Are they kept in stock at multiple distributors or is there 6 – 12 week lead time? What are your requirements for availability? You don’t want to get stuck with a large order and have to wait three months to be able to fill it. Then there is a question of how new the part is and whether it will be around for the duration of your product life cycle. If your product will be around for 10 years then you need to find a part that the manufacturer guarantees will still be built in 10 years.
Step 8: Select a development kit
One of the best parts of selecting a new microcontroller is finding a development kit to play with and learn the inner working of the controller. Once an engineer has settled their heart on the part they want to use they should research what development kits are available. If a development kit isn’t available then the selected part is most likely not a good choice and they should go back a few steps and find a better part. Most development kits today cost under $100. Paying any more than that (unless it is designed to work with multiple processor modules) is just too much. Another part may be a better choice.
Step 9: Investigate compilers and tools
The selection of the development kit nearly solidifies the choice of microcontroller. The last consideration is to examine the compiler and tools that are available. Most microcontrollers have a number of choices for compilers, example code and debugging tools. It is important to make sure that all the necessary tools are available for the part. Without the right tools the development process could become tedious and expensive.
Step 10: Start Experimenting
Even with the selection a microcontroller nothing is set in stone. Usually the development kit arrives long before the first prototyped hardware. Take advantage by building up test circuits and interfacing them to the microcontroller. Choose high risk parts and get them working on the development kit. It may be that you discover the part you thought would work great has some unforeseen issue that would force a different microcontroller to be selected. In any event, early experimentation will ensure that you made the right choice and that if a change is necessary, the impact will be minimal!
Jacob Beningo is a lecturer and consultant on embedded system design. He works with companies to develop quality and robust products and overcome their embedded design challenges. Feel free to contact him at jacob@beningo.com or at his website www.beningo.com.
TI Employee BoosterPack Challenge
It looks like TI is offering a design challenge to their employees to build a great booster pack. I can't wait to see what designs come out of this. I started to review some of the submissions and saw my obvious favorite, a quad copter booster pack.
You might be unsure of what a booster pack is. A booster pack is an add on board that mates to TI's microcontroller development kits. These development kits are called launchpads and they are available for TI's 16bit MSP430, their C2000 DSP line, and their ARM Cortex M4 microcontroller line. There are numerous booster packs available and TI has straight forward instructions on how to build your own - link.
Here is a link to the employee entries thus far - link.
DIY Laser Cutter for PCB Stencils
I saw this article and needed to repost. Please exercise caution if you attempt to built this. Here is the full link to the instructions - link:
The laser cutter can cut very accurate stencils from adhesive backed black vinyl sheets (on Amazon) for ICs with a pitch of 0.5mm (SON-10) and 0402 resistors (and possibly even smaller parts). These stencils are disposable and so cheap that you do not have to worry about using your stencils on one or two PCBs.

It gets better. You can use your RepRap as a laser cutter. All you need is a laser, a laser driver circuit board, and updated firmware (see below). While I built my laser cutter to be a laser cutter and not a 3D printer, I still used the RAMPS for the electronics even though it was built for the RepRap.
Before going onto how I built the laser cutter, I want to give you a quick overview of the design flow once everything is up and running:
DIY Laser Cutter for PCB Stencils
Friday, 29 March, 2013 18:27 Last Updated on Friday, 29 March, 2013 23:14
20 Comments
Introduction
Are you sick and tired of using a tooth pick to apply solder paste? Are you still using through hole components because you don’t want to deal with soldering surface mount devices (SMD)? If so, this post provides you with guidelines for building your very own laser cutter for cutting PCB stencils. With a total cost of approximately $200 (it can be significantly less if you already have parts laying around), this project can pay for itself very quickly. While you can get “low cost” stencils for your PCBs, they still can be quite expensive if you are only creating one or two boards.The laser cutter can cut very accurate stencils from adhesive backed black vinyl sheets (on Amazon) for ICs with a pitch of 0.5mm (SON-10) and 0402 resistors (and possibly even smaller parts). These stencils are disposable and so cheap that you do not have to worry about using your stencils on one or two PCBs.
It gets better. You can use your RepRap as a laser cutter. All you need is a laser, a laser driver circuit board, and updated firmware (see below). While I built my laser cutter to be a laser cutter and not a 3D printer, I still used the RAMPS for the electronics even though it was built for the RepRap.
Before going onto how I built the laser cutter, I want to give you a quick overview of the design flow once everything is up and running:
- First, I create a circuit board and order it from either Seeedstudio or OSHPark. Eventually, I will be using HackEDA for my schematic designs (go check them out!).
- Next I make sure I have all the components I need.
- Once the boards arrive, I export the gerber files for the stencils from Eagle CAD using a simple CAM processor.
- I then run a custom Python script which reads a gerber file and outputs a G-code file that the RAMPS electronics can understand.
- Using pronterface (a RepRap interface software), I control the laser via G-code creating the stencil
- A few minutes later, a perfect stencil has been created!
- Using a credit card or razor blade I apply solder paste to the board.
- I then manually place the parts using tweezers (sadly I do not have a pick and place machine…. yet).
- Finally, I carefully place the populated board in my toaster oven reflow oven.
- Approximately 5 minutes later, a perfectly soldered surface mount PCB is ready to be tested!
Thursday, March 28, 2013
Zigbee IP is released
I found this on the Zigbee Alliance website: link.
 While ZigBee
hasn't become as ubiquitous in wireless as the likes of Bluetooth or
WiFi, it has carved out niches in home automation and low-power gear.
The format is about to expand its world a little further now that a more
network-savvy spec, ZigBee IP, is officially available for everyone.
The upgrade adds IPv6 and tougher security to the open mesh networking formula, letting it more easily join an internet of things
where there's potentially billions of connected devices. The ZigBee
Alliance isn't naming customers at this stage, although it's quick to
note that ZigBee IP was built for smart grid use: don't be surprised if you first see it behind the scenes, keeping energy use in check.
While ZigBee
hasn't become as ubiquitous in wireless as the likes of Bluetooth or
WiFi, it has carved out niches in home automation and low-power gear.
The format is about to expand its world a little further now that a more
network-savvy spec, ZigBee IP, is officially available for everyone.
The upgrade adds IPv6 and tougher security to the open mesh networking formula, letting it more easily join an internet of things
where there's potentially billions of connected devices. The ZigBee
Alliance isn't naming customers at this stage, although it's quick to
note that ZigBee IP was built for smart grid use: don't be surprised if you first see it behind the scenes, keeping energy use in check.
Friday, March 22, 2013
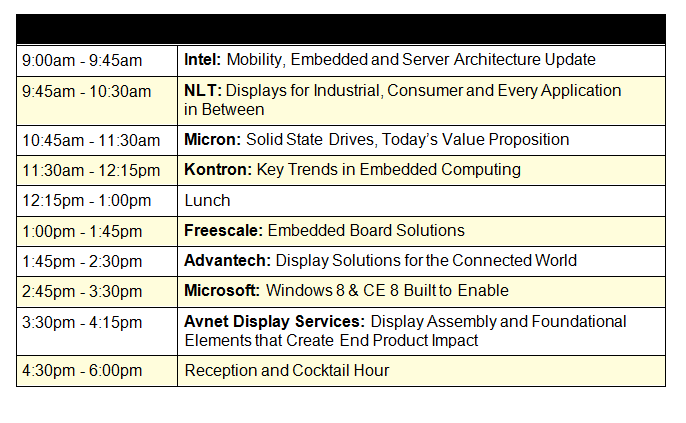
Avnet is hosting an Embedded Conference in Michigan
I wanted to let you know that on April 24, 2013, Avnet will be hosting Embedded World at our Michigan office. Avnet Electronics Marketing introduces Embedded World, a one-of-a-kind event that will provide
attending customers with a tour of the Embedded World. Hear from key lines and talk trends in
embedded processing, displays, software and storage. If you’re working on integrating, designing
and implementing technology in 2013 and beyond, then this event is for you.
For more info visit this link.

attending customers with a tour of the Embedded World. Hear from key lines and talk trends in
embedded processing, displays, software and storage. If you’re working on integrating, designing
and implementing technology in 2013 and beyond, then this event is for you.
For more info visit this link.
Wednesday, March 20, 2013
Good Overview on the PI Factory
Team,
I missed posting an article on PI day, but I thought it never is to late to talk about PI. I just saw this great video link about Raspberry PI and how they are bringing production to the UK. The volume of Raspberry PI's sold is amazing.
Check out the video at this link.
Take care,
Jason
I missed posting an article on PI day, but I thought it never is to late to talk about PI. I just saw this great video link about Raspberry PI and how they are bringing production to the UK. The volume of Raspberry PI's sold is amazing.
Check out the video at this link.
Take care,
Jason
Thursday, March 7, 2013
Next generation BeagleBone is coming...
Hello,
I am proud to announce that the next generation of the BeagleBone is coming out. For those of you unfamiliar with the original BeagleBone, it is an applications processor board capable of being designed into HMI panels, simple tablets, industrial control systems, and medical devices. BeagleBone is based on TI's Sitara line of processors and is a low-cost way to get started into higher end applications because the BeagleBone is only $89. Now, BeagleBone is coming out with a brand new revision that is lower cost, higher performance, has an HDMI video port on it, and is a different color. Here is an "un-zipping" and a video link. I am so excited to get my hands on one:

I am proud to announce that the next generation of the BeagleBone is coming out. For those of you unfamiliar with the original BeagleBone, it is an applications processor board capable of being designed into HMI panels, simple tablets, industrial control systems, and medical devices. BeagleBone is based on TI's Sitara line of processors and is a low-cost way to get started into higher end applications because the BeagleBone is only $89. Now, BeagleBone is coming out with a brand new revision that is lower cost, higher performance, has an HDMI video port on it, and is a different color. Here is an "un-zipping" and a video link. I am so excited to get my hands on one:
Saturday, March 2, 2013
Transistor Radios are still relevant
I saw this new book on building your own transistor radio. My wife and I have purchased the book and we plan to build up a few of the different types of radios. If you are interested in understanding the theory in a practical way, this book is definitely for you - link.
US Patent System - First to File
The US is going to be changing to a first-to-file system starting March 16, 2013. The system as it exists today is the first-to-invent system as was changed in 2011 under the America Invents Act. With the new system we will join every other country in the first-to-file approach. The theory is that we will bring back efficiencies with the patent system. Check out this law review of the different changes coming - link.
Saturday, February 16, 2013
Triple Level Nand... Crazy
Miniaturization in storage continues as Micron announced its smallest 128Gbit NAND flash memory fabbed on a 20nm process. The memory device uses a triple-level-cell (TLC) design which stores three bits of information per cell. This means a reduction in size of the memory footprint for the same size density as MLC memory today. Check out the link - link.
Friday, February 8, 2013
Getting AMPed for the Weekend?
I saw a video this week that I wanted to share on op-amp design basics. For those of you who deal with amplifiers on a day to day basis you will find this training trivial. However, I do feel his explanations gives a good feeling for how to understand basic properties of op-amps:
PBS - Doing a show on Silicon Valley
Hello, I have to thank my wife for showing me this great series about silicon valley on PBS. Hopefully we can get as addicted to it as we are to Downton Abbey. Check out the link for more information - link.
Friday, January 25, 2013
Artistic PCB Boards with a script
I love beautifully created traces on a PCB board. It appears that others are with me. I saw this post from someone who has wrote a program to artistically render traces. It may not be practical for a lot of the dense designs we all work on, but I could definitely see this as useful for simpler board stackups with simple routing. Here is a snapshot of the boards and a link to the article: link.


NFC and The Future
Have you been hearing about Near Field Communications, more popularly referred to as NFC? NFC is a superset of RFID that runs at 13.56 MHz. The unique differentiation between NFC and RFID is that NFC silicon chips can communicate in three different ways:
1.) Read/Writer to Tag mode - This is the traditional use case of RFID where you have a reader/writer chip that reads a tag, most often a badge. You see this type of implementation all the time in security access systems.
2.) Tag emulation mode - This is the mode where the silicon device can emulate a traditional tag. So now you could use an NFC enabled phone as your security access to get in the building instead of having to also carry a badge.
3.) Peer to Peer mode - This is the mode that you see on all the Samsung Galaxy commercials where two people are bumping their phones together to exchange music playlists.
So why am I writing about NFC? Well, for one Avnet has great partnerships on this technology with vendors like NXP, TI, ST, Maxim, as well as passive antenna suppliers. Secondly, I am also hoping that we can make this technology more prevalent by having Apple adopt it in its next round of products. Today, Android phones, Android Tablets, and Windows based laptops are shipping with NFC technology enabled.
So before I wrap up, I wanted to highlight a few reasons why you might want to consider NFC for your next device:
1.) Enablement - With cellphones, tablets, and laptops having this feature you can integorrate your products in a straight-forward manner.
2.) Low Power - You can use the energy of the 13.56MHz antennna and power your NFC enablement compeltely through the phone, tablet, laptop.
3.) Short Range - There is a short range (Few cms), but I am finding this is sufficient for most applications. If you need to program your device through packaging or in an enclosure, I have showcased the range to be suitable for NFC.
That's all for now! Have a great Friday!
-Jason
Thursday, January 17, 2013
The Offspring of Fairchild Camera and Instrument
In my family, our lineage was taught to me at a young age. It made it easy to memorize my lineage because a large portion of my family occupies the same cemetery. In addition, my dad has spent a lot of time tracing my ancestors on his side and educating me about our ancestry. I have always had an interest in genealogy and so I was pleasantly surprised when I found the family tree from Fairchild Camera and Instrument. I wanted to repost this article from DSP Related so that you can see what great companies spawned from Fairchild Camera and Instrument:
There used to be a fruit market located at 391 San Antonio Road in Mountain View, California. In the 1990's I worked part time in Mountain View and drove past this market's building, shown in Figure 1, many times, unaware of its history. What happened at that fruit market has changed the lives of almost everyone on our planet. Here's the story.
 William Shockley
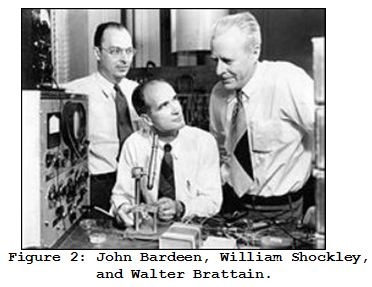
In 1948 the brilliant physicist William Shockley, along with John Bardeen and Walter Brattain, co-invented the transistor at Bell Laboratories in New Jersey. (Justifiably they were awarded Nobel Prizes in Physics in 1956.)
 In 1955, deciding to move back to where he grew up, Shockley returned
to California. He wanted to start his own company to commercialize
semiconductor devices. Joining a college friend's successful company,
Beckman Instruments, Shockley was appointed Director of Beckman's newly
founded Shockley Semiconductor Laboratory division which bought the old
fruit market at 391 San Antonio.
In 1955, deciding to move back to where he grew up, Shockley returned
to California. He wanted to start his own company to commercialize
semiconductor devices. Joining a college friend's successful company,
Beckman Instruments, Shockley was appointed Director of Beckman's newly
founded Shockley Semiconductor Laboratory division which bought the old
fruit market at 391 San Antonio.
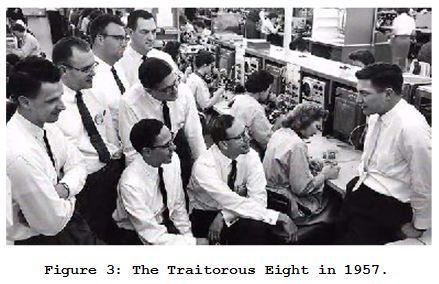
Shockley, who was nationally famous in the field of electronics at that time recruited the best and brightest scientists and engineers to work at his Shockley Semiconductor Laboratory. However, his domineering management style, bizarre behavior that bordered on paranoia, and his loss of interest in developing commercial transistors and integrated circuits caused eight employees to leave Shockley Labs. That was on Sept. 18, 1957, a day that was ranked by the New York Times newspaper as one of the Top 10 Days That Changed the World.
Traitorous Eight
Those "Traitorous Eight", as Shockley called them, wanted to start their own semiconductor company. (Those engineers are shown in Figure 3. And yes, engineers really did dress that way in the late 1950s.)
 Intrigued by these new-fangled transistors, New York industrialist
Sherman Fairchild agreed to finance The Traitorous Eight by creating a
new company called Fairchild Camera and Instrument. It was at Fairchild
that the first commercially-viable integrated circuit was invented. From
that single company evolved the greatest collection of semiconductors
companies in the world, as well as a California location that came to be
known as "Silicon Valley." Figure 4 gives you some idea of the
astounding commercial outgrowth of Fairchild Camera and Instrument.
Intrigued by these new-fangled transistors, New York industrialist
Sherman Fairchild agreed to finance The Traitorous Eight by creating a
new company called Fairchild Camera and Instrument. It was at Fairchild
that the first commercially-viable integrated circuit was invented. From
that single company evolved the greatest collection of semiconductors
companies in the world, as well as a California location that came to be
known as "Silicon Valley." Figure 4 gives you some idea of the
astounding commercial outgrowth of Fairchild Camera and Instrument.
 (Figure 4 is a redrawn, without permission, version of a graphic
found on page 12 of the in October 2007 issue of The IEEE Spectrum
magazine. A more informative version of Figure 4 is available at http://www.businessweek.com/pdfs/fairkid.pdf.)
(Figure 4 is a redrawn, without permission, version of a graphic
found on page 12 of the in October 2007 issue of The IEEE Spectrum
magazine. A more informative version of Figure 4 is available at http://www.businessweek.com/pdfs/fairkid.pdf.)
The venture capital firm of Kleiner, Perkins, Caufield & Byers is included in Figure 4 because they provided financial backing for many electronic and information technology startup companies. You may have heard of some of those companies; Amazon, Google, Sun Microsystems, AOL, Compaq, Electronic Arts, Intuit, Netscape, and others.
Transistors, They're Everywhere
Roughly ten years ago a technologist in the semiconductor industry estimated that mankind produces more transistors annually than grains of rice. That estimate is not as far-fetched as it might seem. In reference [2] the authors stated:
Transistors do indeed seem to be nearly everywhere in our modern lives. I walked around the rooms of my 1500 ft2 house and realized that no matter where I stood I was never more than 3 meters from a semiconductor device. (On my bathroom counter resides a battery powered tooth brush, sitting in its recharging base.) I finally stood at the far end of my garage away from the corner where my clothes washer is located, thinking that was a spot surely more than 3 meters from a transistor. Then I realized that on the outside of the garage wall, next to where I was standing, is my electric utility company’s Smart Meter with its RF transmitter circuitry.
The inventions of the transistor and the integrated circuit (interconnected transistors) have literally transformed our world--from singing greeting cards to iPads, from home computers to interplanetary spacecraft. There is no way to overstate the importance of the technology that blossomed from that little fruit market at 391 San Antonio Road.
The Little Fruit Market
Posted by Rick Lyons on Jan 14 2013There used to be a fruit market located at 391 San Antonio Road in Mountain View, California. In the 1990's I worked part time in Mountain View and drove past this market's building, shown in Figure 1, many times, unaware of its history. What happened at that fruit market has changed the lives of almost everyone on our planet. Here's the story.
In 1948 the brilliant physicist William Shockley, along with John Bardeen and Walter Brattain, co-invented the transistor at Bell Laboratories in New Jersey. (Justifiably they were awarded Nobel Prizes in Physics in 1956.)
Shockley, who was nationally famous in the field of electronics at that time recruited the best and brightest scientists and engineers to work at his Shockley Semiconductor Laboratory. However, his domineering management style, bizarre behavior that bordered on paranoia, and his loss of interest in developing commercial transistors and integrated circuits caused eight employees to leave Shockley Labs. That was on Sept. 18, 1957, a day that was ranked by the New York Times newspaper as one of the Top 10 Days That Changed the World.
Traitorous Eight
Those "Traitorous Eight", as Shockley called them, wanted to start their own semiconductor company. (Those engineers are shown in Figure 3. And yes, engineers really did dress that way in the late 1950s.)
The venture capital firm of Kleiner, Perkins, Caufield & Byers is included in Figure 4 because they provided financial backing for many electronic and information technology startup companies. You may have heard of some of those companies; Amazon, Google, Sun Microsystems, AOL, Compaq, Electronic Arts, Intuit, Netscape, and others.
Transistors, They're Everywhere
Roughly ten years ago a technologist in the semiconductor industry estimated that mankind produces more transistors annually than grains of rice. That estimate is not as far-fetched as it might seem. In reference [2] the authors stated:
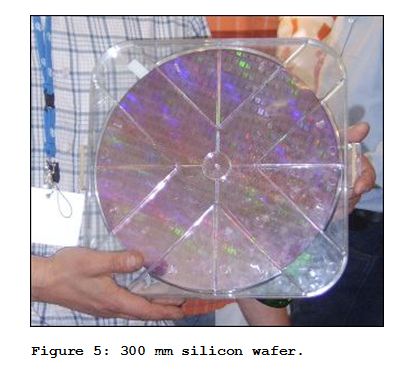
- Semiconductor production has increased by an astounding average of 16% per year for the last forty years.
- In 2002 there were more bits of memory on a single 300 millimeter silicon wafer than were produced by the entire semiconductor industry in 1984.
- There were more transistors produced in 2002 than grains of rice, and each rice grain could buy 100's of transistors.
Transistors do indeed seem to be nearly everywhere in our modern lives. I walked around the rooms of my 1500 ft2 house and realized that no matter where I stood I was never more than 3 meters from a semiconductor device. (On my bathroom counter resides a battery powered tooth brush, sitting in its recharging base.) I finally stood at the far end of my garage away from the corner where my clothes washer is located, thinking that was a spot surely more than 3 meters from a transistor. Then I realized that on the outside of the garage wall, next to where I was standing, is my electric utility company’s Smart Meter with its RF transmitter circuitry.
The inventions of the transistor and the integrated circuit (interconnected transistors) have literally transformed our world--from singing greeting cards to iPads, from home computers to interplanetary spacecraft. There is no way to overstate the importance of the technology that blossomed from that little fruit market at 391 San Antonio Road.
Subscribe to:
Comments (Atom)